5 Steps to automate Indian GST in ERPNext
Automating GST just got simple - here is the 5 Step guide to automate your GST Invoicing effectively.

GST is an indirect tax levied upon the supply of goods and services, from manufacturing to sales, it covers all the stages till it reaches the end-user making the tax system simple from what it was before.
Classification of GST:
CGST: Central GST - for Central Government (Intra-State)
SGST: State GST - for State Government (Intra-State)
IGST: Integrated GST - for Central Government (Inter-State)
While making a sale within the state, the tax is divided between Central and State Government (CGST+SGST), whereas when sold outside the state, the tax goes only to Central Government (IGST).
There are currently six main tax slabs of GST which covers different goods and services offered, it can be hard to keep a track of all the transactions which are Inter-State or Intra-State along with what taxes to apply on.
To ease things out and automate these processes, we at Frappe have made a good and an efficient way to configure the taxes in ERPNext in 5 simple steps.
- Update your company’s and client’s addresses
- Configure your GST accounts
- Create different Tax Slabs
- Classification of Inter-State and Intra-State Taxes
- Configuring Invoice Templates
Step 1 - Update Addresses
In ERPNext, GST is applied based on the Company's address and the client’s address.
To automate the whole process, the very first step is to update your company's address.
The second step as you must have already guessed is to update your customer's and supplier's addresses.
The key here is to update the GST State and Party GSTIN field present in Address document type.

> Note - For Supplier’s Address, Party GSTIN is also mandatory.
Step 2 - Configure your GST Accounts
Once you have updated your Address Master, it's time to let the system know which accounts you want to use for GST taxation, to configure, from the search bar, type GST Settings and enter your GST accounts as required.

Step 3 - Item-wise GST setup
To let the system know what tax accounts and tax rates are applicable on your goods and services, create multiple Item Tax Template and assign it to its respective Item from Item master.

> Configuration for 12% GST in Item Tax Template

> Applying Item Tax Template in Item Master
Likewise, for other tax rates, create different Item Tax Template.
Step 4 - Classification of Inter-State and Intra-State Taxes
Create two Tax Category of Source State same as your company’s address with one as ‘is Inter-State’ checked.

Step 5 - Configuring your Invoice Templates
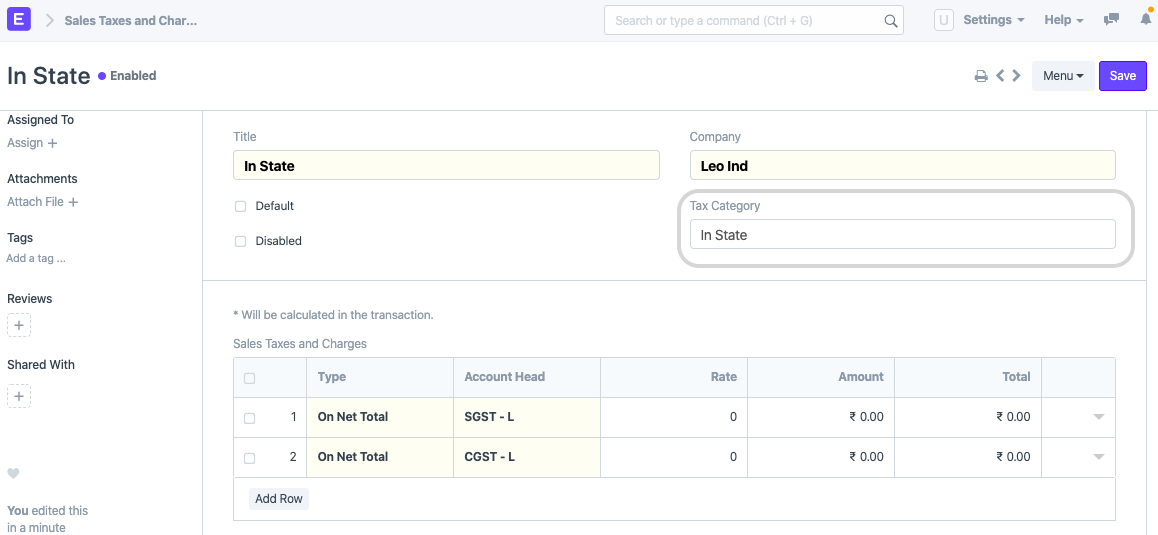
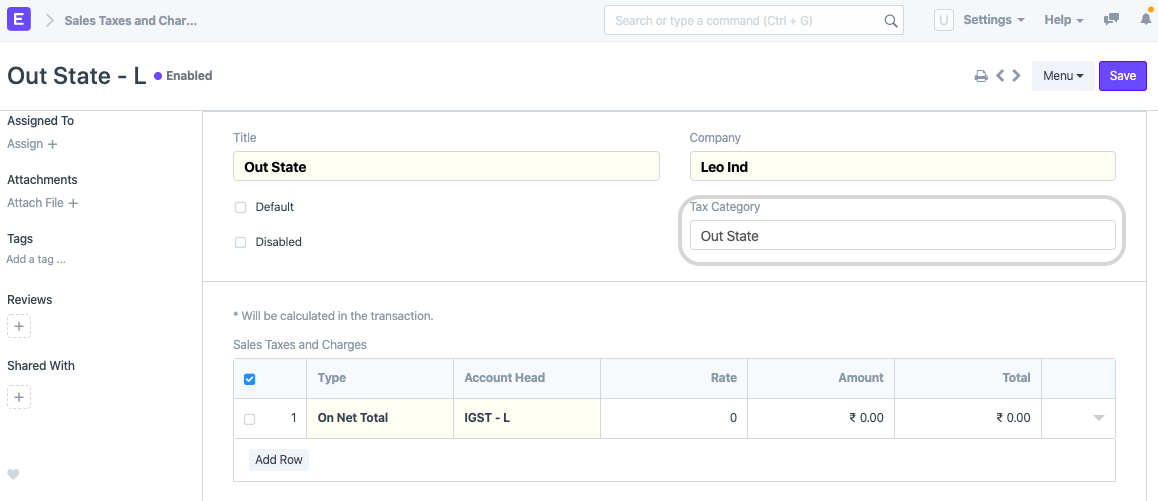
The last and final step is to create two Sales Taxes and Charges Template and two Purchase Taxes and Charges Template with different Tax Category applied.
Here, enter your Tax Accounts in Account Heads and leave rest at 0 - reason being, we are fetching the rates from Item Master.

> Configuration for Inter State Tax Invoicing

> Configuration for Intra State Tax Invoicing
Note: Automatically Add Taxes and Charges from Item Tax Template should be disabled in Accounts Settings.
Once done, refresh your ERPNext account and check by creating an invoice or an order, the taxes will be fetched once you have chosen your Customer/Supplier.
ERPNext also comes with preloaded 14000+ HSN codes, GST reports, calculates TDS on the go and with uploadable JSON files to file your Tax Returns directly.
Get started with ERPNext, the #1 ERP to adapt to your business and scale changes with technology.
Harshit Agrawal
Certified ERPNext Consultant at Frappe
Have you checked with Multiple Companay ? Does it work ?
Hi harshit,
In Step 3, here all 3 taxes are added to the item tax template. Trying this causes all 3 taxes to be levied while creating a purchase invoice inspite of following Steps 4 and 5. We have two state GST so I had created total 4 such taxes in Sales Taxes and Purchase Taxes Template.
Can you please confirm if all 3 taxes were to be added like that ?
Google 'ERPNext E-way Bill'
How to generate ewaybill ??