Step By Step Guide For Payroll Management For India Using ERPNext
How to manage payroll for India in 7 steps!
·
8 min read
April has come to an end and a new financial year has begun in India. This is the time when taxes are being done and payroll processing changes for employees hopefully with a raise. If you haven’t already closed your book of accounts yet, you are probably in audit season.

Image via Pixabay
Like most organizations in India, if you are using one application for accounting, and another for HR, you obviously need to jump between them for functionalities. You process your payroll, generate the salary slips in the HR app and then go back to your accounting app to update the entries so the integrity of your financial data remains. Sounds like a lot of work and struggle get an important process right! Also, if you’re purely relying on an ancient accounting package to manage payroll, you are missing out on essential HR processes like leave management, recruitment, et al!
These revisions and the entire salary process itself can become daunting for the HR and Accounting departments. So much so, that in recent years, outsourcing payroll processing has itself become a significant business.
However, this doesn’t have to be that complicated or challenging. With an ERP, you can manage these within a single application, with consistent user experience
We will see how organizations can streamline their payroll processes and get a grip on managing payroll using ERPNext, all broken down in 7 simple steps.
1. Defining Payroll Period And Tax Slabs
By definition, Payroll Period is the time span for which you are defining the current salaries. Generally, for India, this period would be from 1st of April of a year to the 31st of March of the next year.
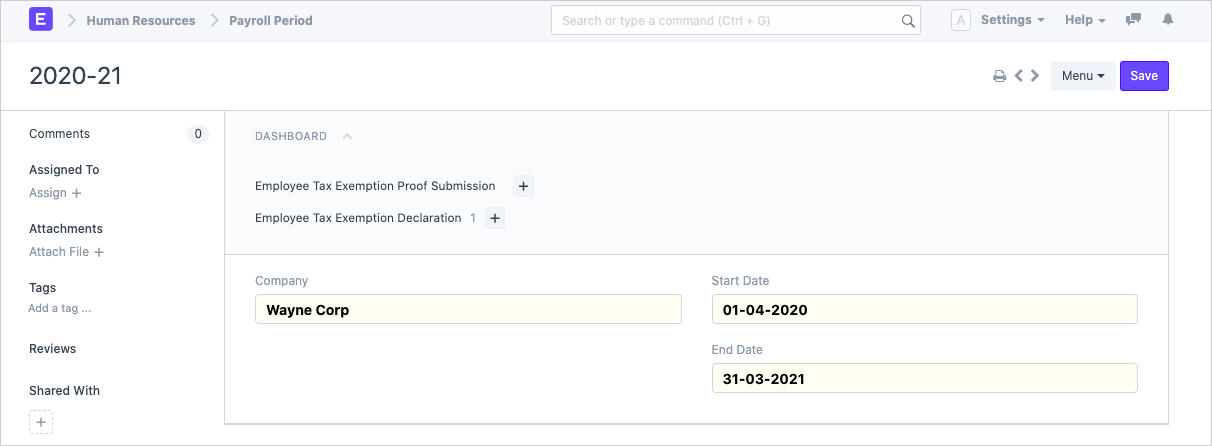
Figure 1: Payroll Period in ERPNext
Once you have configured the Payroll Period, let’s move to defining the tax slabs.
For the current financial year FY 2020-2021, employees have a choice between opting for the old tax regime or the new one. If you are one of the companies that is allowing its employees to choose the tax regime, ERPNext lets you create multiple slabs to get this done.
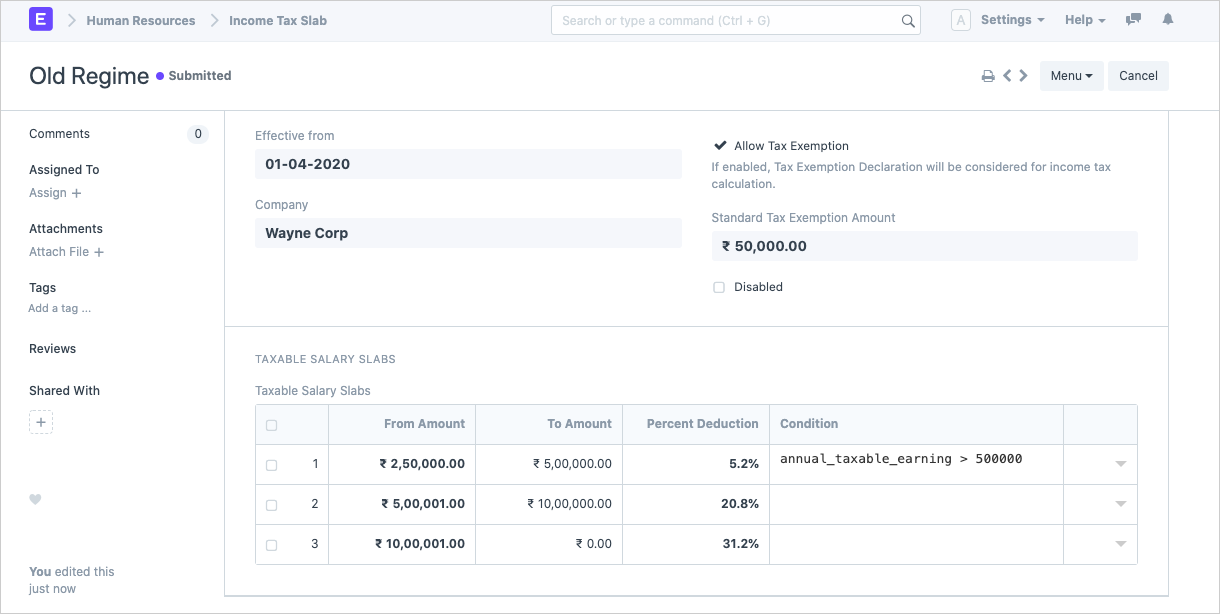
Figure 2: Tax Slabs in ERPNext (Inclusive of cess and other charges)
In Figure 2, the payroll is configured as per FY 2019-20 plan. Under the interim budget, the rebate amount was hiked to ₹12,500/- under section 87A for those falling in the ₹2.5 to 5 lakh bracket. This means that if your net/taxable salary (the total that remains after claiming deductions) is up to ₹5 lakh — you pay no tax.
Hence, you have something like annual_taxable_earning > 50000 in the condition. If this condition fails, ie, annual earnings in less than ₹5 lakh, then no tax is applicable!
Similarly, when you can create a new tax slab as per the 2020-21 regime, it’ll look something like this:
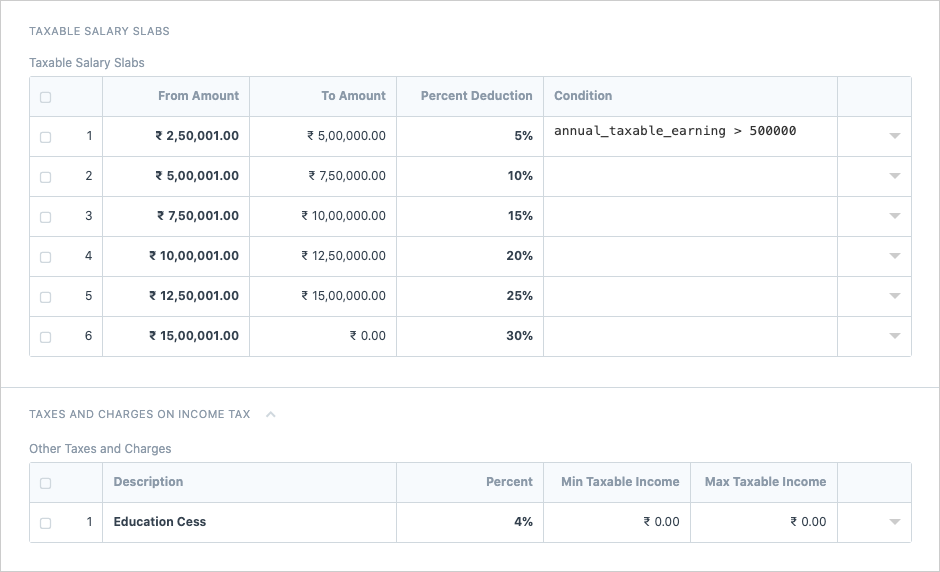
Figure 3: Tax Slabs as per New Regime
2. Configuring Individual Components
Now let’s move to configuring individual components of the salary in ERPNext. These would be Basic, HRA, conveyance, Income Tax, etc. By default ERPNext will setup some salary components for you already like the ones in Figure 4:
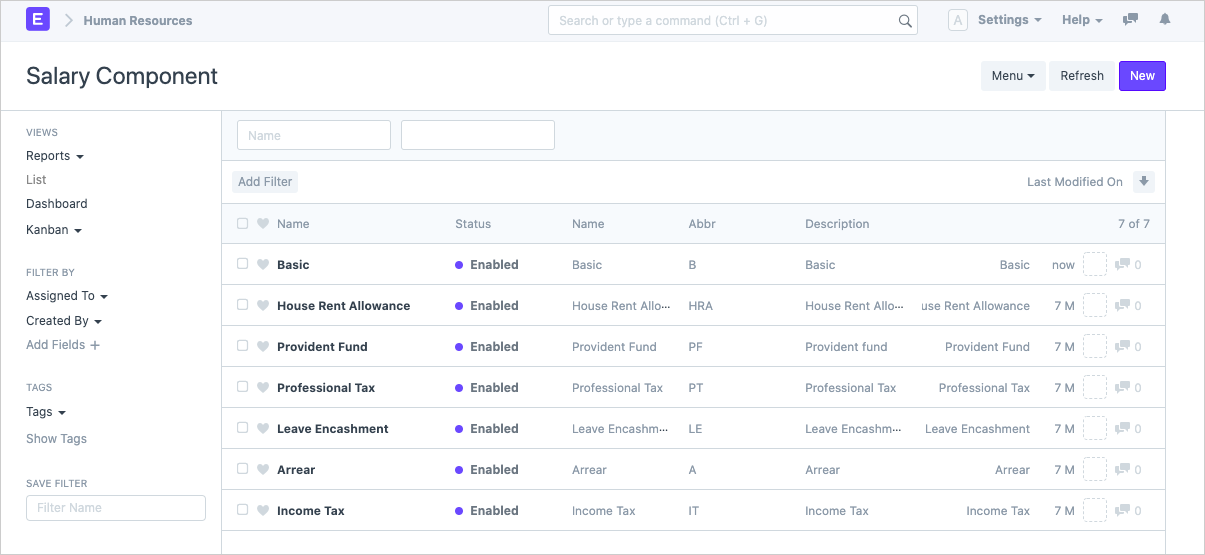
Figure 4: List of Salary Components
When creating the salary components for employees you first need to define whether it is an earning or deduction. Components like HRA, Basic, allowances, are all earnings whereas Income Tax or Professional Tax would be deductions. In the Accounts section, you can select the relevant ledger where the expense postings will be made for that specific component. You can customize the Chart of Accounts in the system and create specific accounting ledgers for this purpose.
For earning components of the salary like Basic, HRA, allowances, etc. you need to check the options as follows:
- Type: Earning (component will show up on the earnings side of the salary slip, is payable to the employee)
- Depends on Payment Days (component will be calculated as per no. of working days in the month)
- Is Tax Applicable (whether tax is applicable on this component or not)
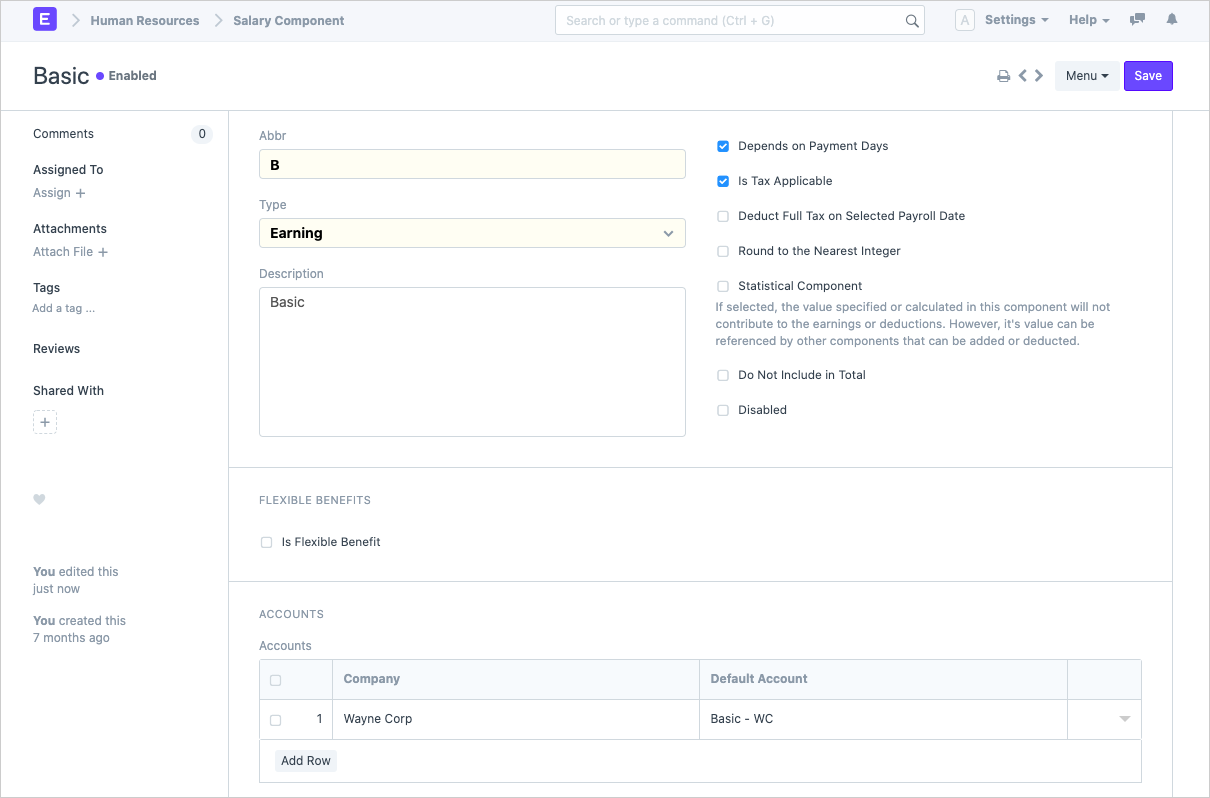
Figure 5: Configuring Components - Basic
When configuring the Income Tax or TDS component in the salary structure, you need to check the following options:
- Type: Deduction (component will show up on the deduction side of the salary slip, is deducted from the salary)
- Variable Based on Taxable Salary (the component will be calculated as per the taxable salary for the month/year). This option is to be checked only for the Income Tax/TDS component.
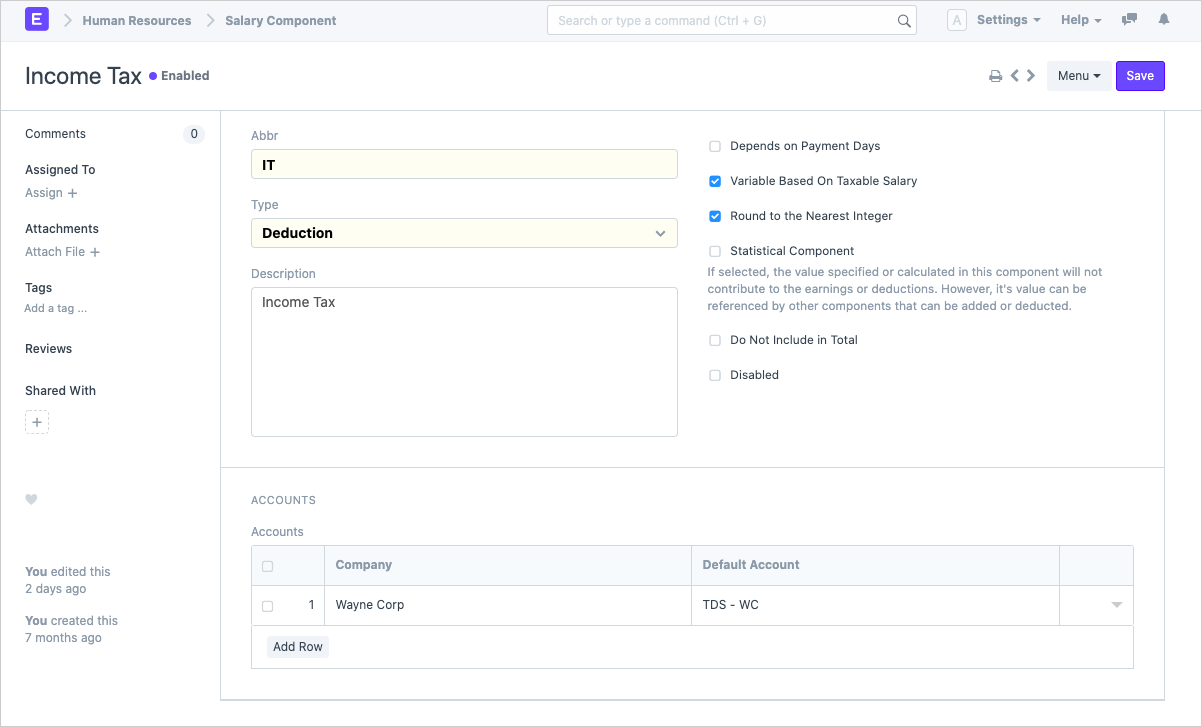
Figure 6: Configuring Salary Components - Income Tax / TDS
Another option has been added for the deduction type of salary component:
- Exempted from Income Tax: You can enable this checkbox if you want the full amount to be exempted from taxable salary without providing any declaration or proof.
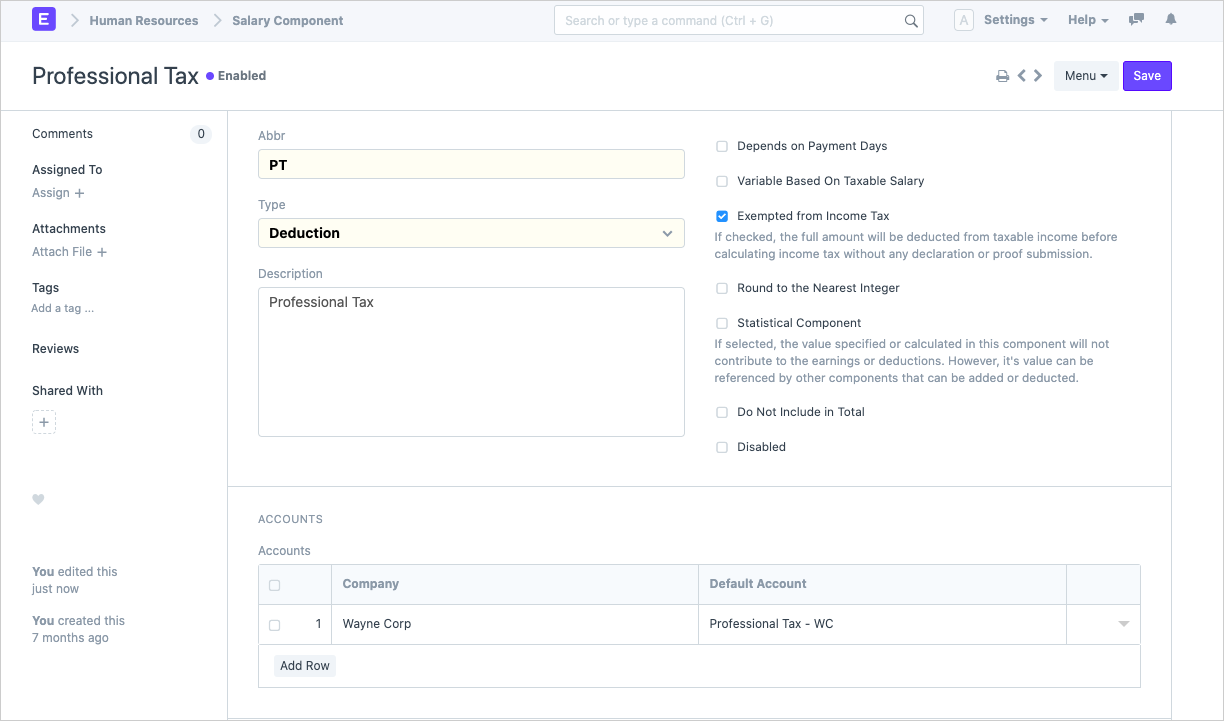
Figure 7: Configuring Components - Professional Tax
If you are interested to learn more about salary components, check out this link. Once you are done with configuring the components, we can move to create the salary structures.
3. Creating Salary Structures
A salary structure is defining the way how salary would be calculated and paid to employees. This eases payroll processing and helps managing payroll better. Within the salary structure, you can define the amount of each component either directly or by using formulae.
Eg: Let’s say your basic is ₹25,000. The HRA is calculated as 50% of basic and the same with special allowances.
Then the Salary structure looks something like this:
| Component | Abbreviation | Amount | Formula | Formula in ERPNext |
| Basic | B | 25000 | ||
| House Rent Allowance | HRA | 50% of basic | B*0.5 | |
| Special Allowance | SA | 50% of basic | B*0.5 |
After adding this in ERPNext, the earnings table should look something like this:
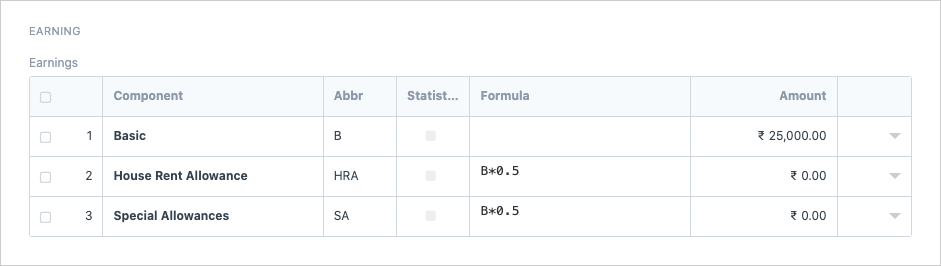
Figure 8: Earning Components in Salary Structure
In the same way, you can define the deductibles and add components such as TDS and Professional Tax, PF (Provident Fund), and so on.
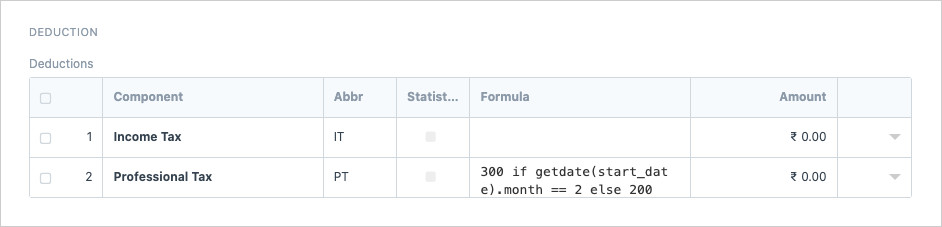
Figure 9: Deduction Components in Salary Structure
In the above image, we have left TDS blank and only marked Variable Based On Taxable Salary in the structure.
Next, moving to Profession Tax. Let’s say we have a company registered in Mumbai, Maharashtra. As per the rules, Profession Tax for the month of February is ₹ 300 compared to 200 for all other months. This formula has been added as:
300 if getdate(start_date).month == 2 else 200
In the same way, you can add the formulae for the tax as per your state and for other components as well.
4. Assigning Salary Structures To Employees
You have created the salary structure successfully. Now, you have to assign it to an employee. Linking the salary structure to every employee manually can be cumbersome. You can use the Data Import Tool to complete this task!
You can also select which tax regime (or slab, as defined earlier) is applicable to the salary structure under the assignment under Income Tax Slab. In this way, each employee is assigned the tax regime which they prefer.
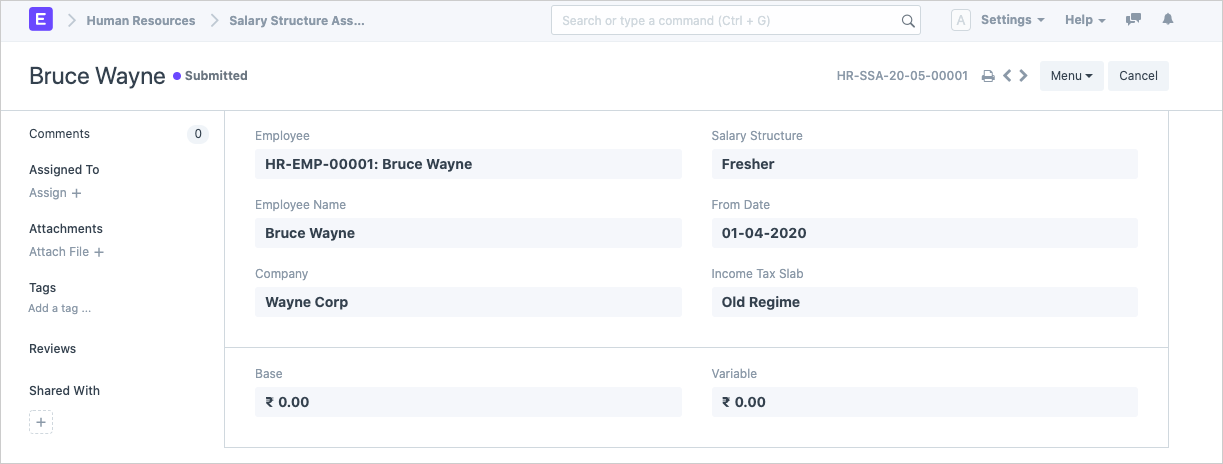
Figure 10: Salary Structure Assignment with Income Tax Slab selection
If, in the middle of the year, you need to update any employee’s salary structure, simply create a new one and assign it to the employee. Remember to choose the date from when the new structure will be applicable. When the payroll is run, it will pick up the latest salary structure available for that period. Cool, isn't it?
5. Adding Employee Tax Exemption Declarations
Before the salary is processed for the new financial year, it is best that employees update their tax exemption declarations. In the declaration, an employee provides the contributions they plan to do in the coming year which will reduce their net taxable income for the entire financial year.
Note that all major exemptions except NPS (with modifications) have been removed from the new (FY 2020-21) regime.
Contributions made to Mutual Funds (ELSS), Provident Funds (PPF/EPF), ULIPs, Life Insurance schemes, Term plans, falling under section 80C, Mediclaim under 80D, HRA, etc. can be added to this. Check out this excellent article to know more about how you can save tax.
You can set up the categories and subcategories under Employee Tax Exemption Category. The categories would be 80C/CCC, 80D, 80E, etc. You can also set up the maximum amount permissible under each category. The subcategories would represent the type of investment made such as Mutual Funds, SIP, or PF.
After setting it up as per the Indian Employee Taxation criteria, the categories and subcategories mapping would be as follows:
| Tax Exemption Subcategory | Category | Maximum Exemption Allowed (₹) |
| Mutual Funds | 80C/CCC | 1,50,000 |
| SIP | 80C/CCC | 1,50,000 |
| ULIP | 80C/CCC | 1,50,000 |
| Home Loan Principal | 80C/CCC | 1,50,000 |
| Life Insurance | 80C/CCC | 1,50,000 |
| Sukanya Kanya Samruddhi Deposit Scheme | 80C/CCC | 1,50,000 |
| Life Insurance | 80C/CCC | 1,50,000 |
| Term Plan | 80C/CCC | 1,50,000 |
| Provident Fund (EPF/PPF) | 80C/CCC | 1,50,000 |
| Tuition Fees | 80C/CCC | 1,50,000 |
| National Pension Scheme | 80CCD | 50,000 |
| Mediclaim/Medical Insurance | 80D | 50,000 |
| Interest on Higher Education | 80E | - |
| Interest on Home Loan | Section 24 | 2,00,000 |
Next, your employees will have to fill up the declarations and enter amounts they have invested as per category. If an employee On submission, it should look like this:
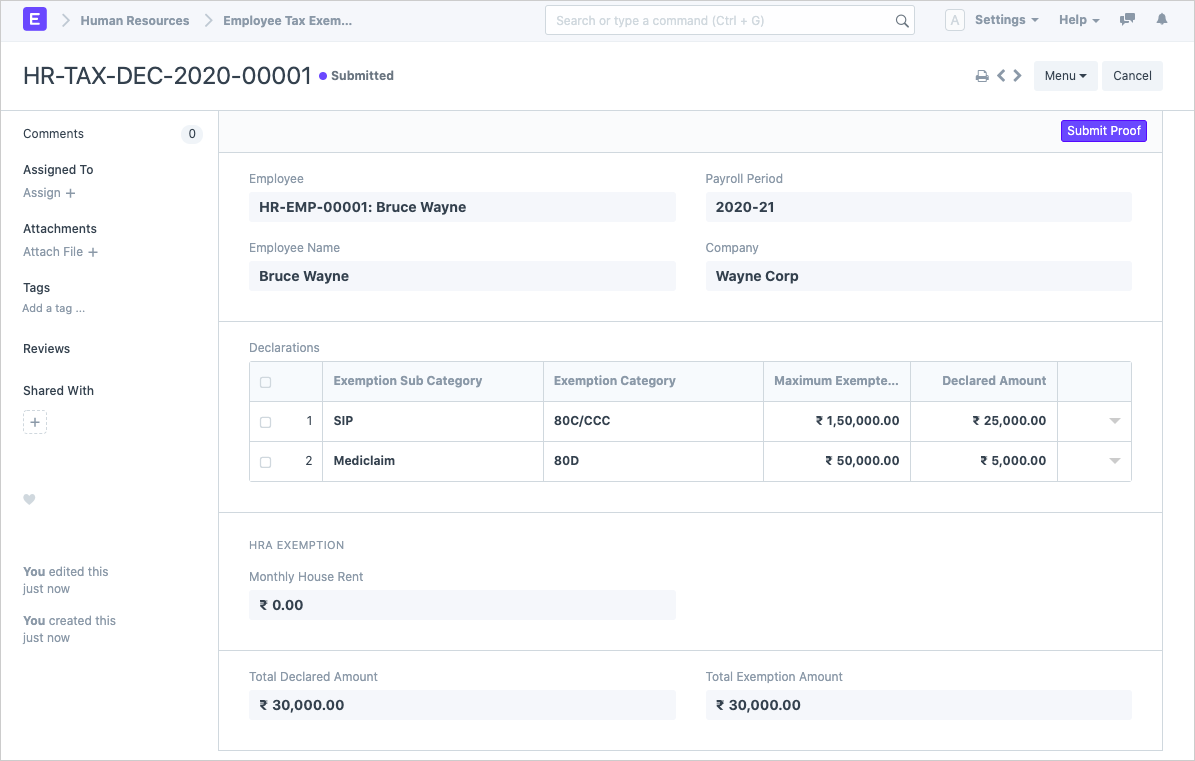
Figure 11: Declaring deductible contributions to reduce your tax liability
When nearing the end of the financial year, you can have the declaration proofs submitted against the declarations made by your employees. The system will then recalculate the TDS deducted so far, and adjust it against the proof submitted for the remaining months of the year.
6. Adding Holiday List
Prior to processing the salary, it is important to mark the leaves for the year (or at least the month for which the salary is being processed). For simplicity, let’s consider, the weekly and public leaves that occur throughout the year, instead of dwelling into the leaves of each employee.
In ERPNext, you can add these under the Holiday List. Once your list is ready, you can add it on a company or an individual level.
7. Processing Payroll
We are done with setting up the process. Let’s jump to process the payroll now.
You will have to make use of Payroll Entry to process the salaries of multiple employees in one go. Based on the selected conditions such as frequency, department, branch, etc. you will get a list of employees. Be sure to select the correct account under Payment Entry from which the payment will be processed for these salaries. .
Next, run the payroll entry. The system will generate the salary slips automatically for all employees as shown in Figure 12.
Figure 12: Running Payroll Entry in ERPNext
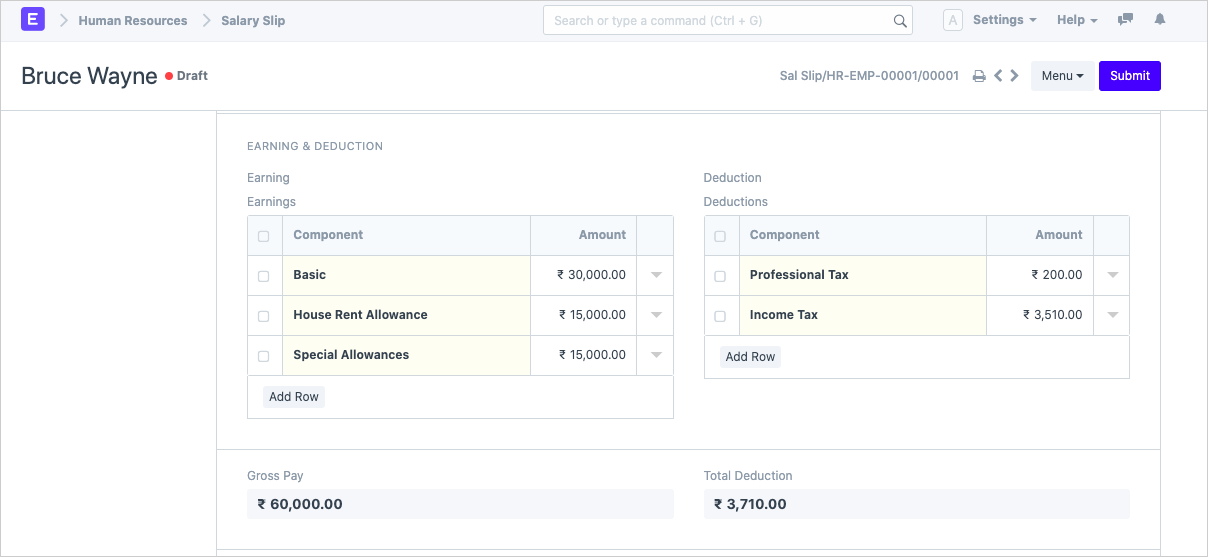
Figure 13: Salary Slip generated from the Payroll Entry
You can verify the salary slips that have been generated and then come back to the payroll entry to submit it, by clicking the Submit Salary Slip button.
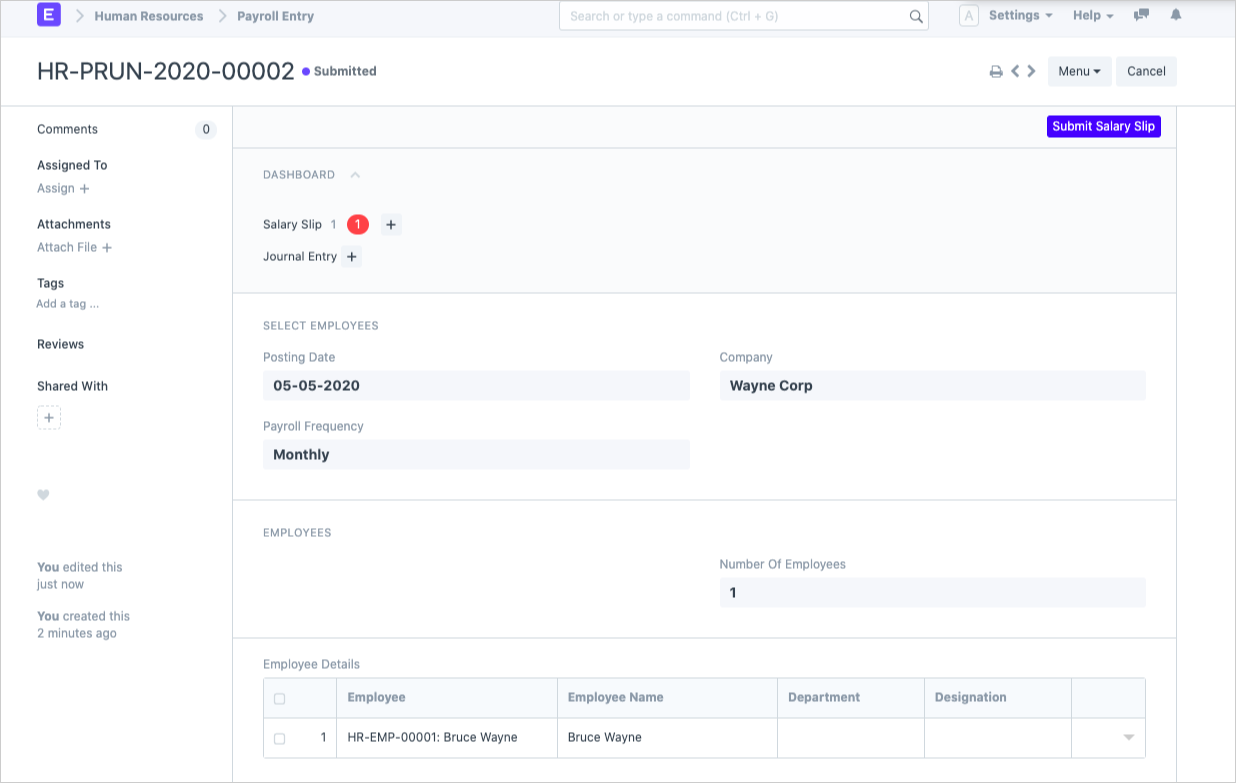
Figure 14: Submit Salary Slip option in Payroll Entry
On submission of the slips, the system will create an accrual entry for the payables. This entry will book all the expenses for the company when processing the payroll. The expenses are booked in the ledgers selected when setting up the salary components.
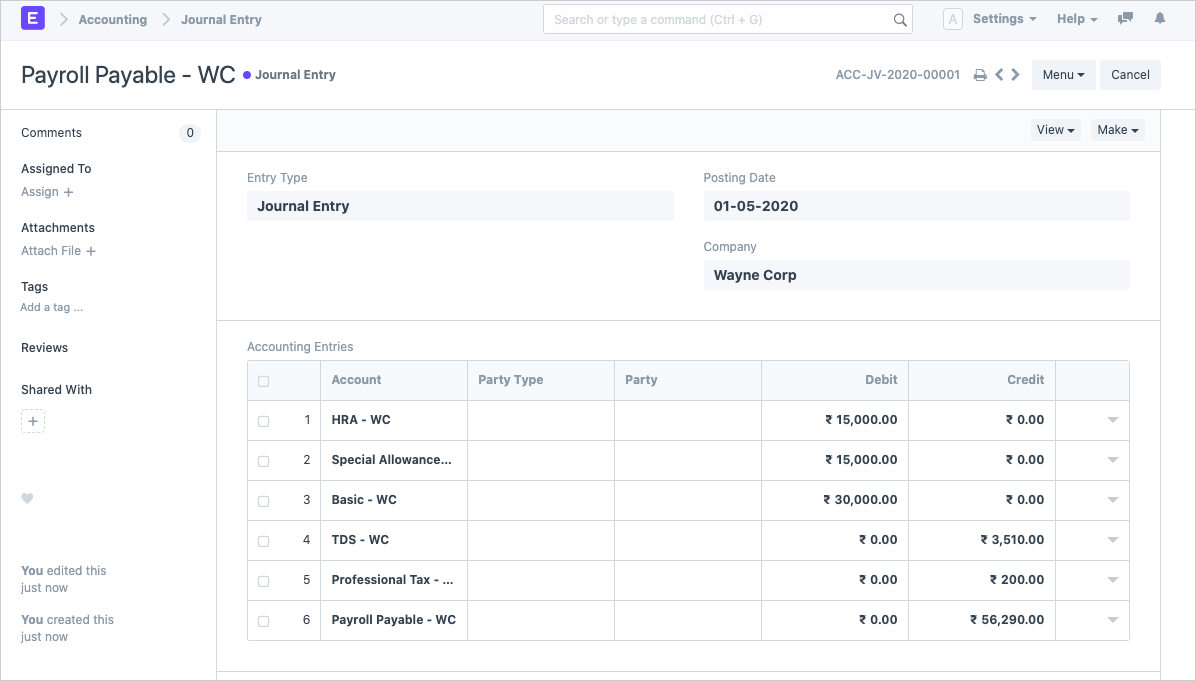
Figure 15: Accrual Entry for Payroll
After this, you get an option to make a bank entry which will represent transferring the payable amount from the company to the employee. This happens when by clicking on the Make Bank Entry option. Note that the bank entry is just to balance your books, and won’t actually transfer the amount from your bank account to your employee’s.
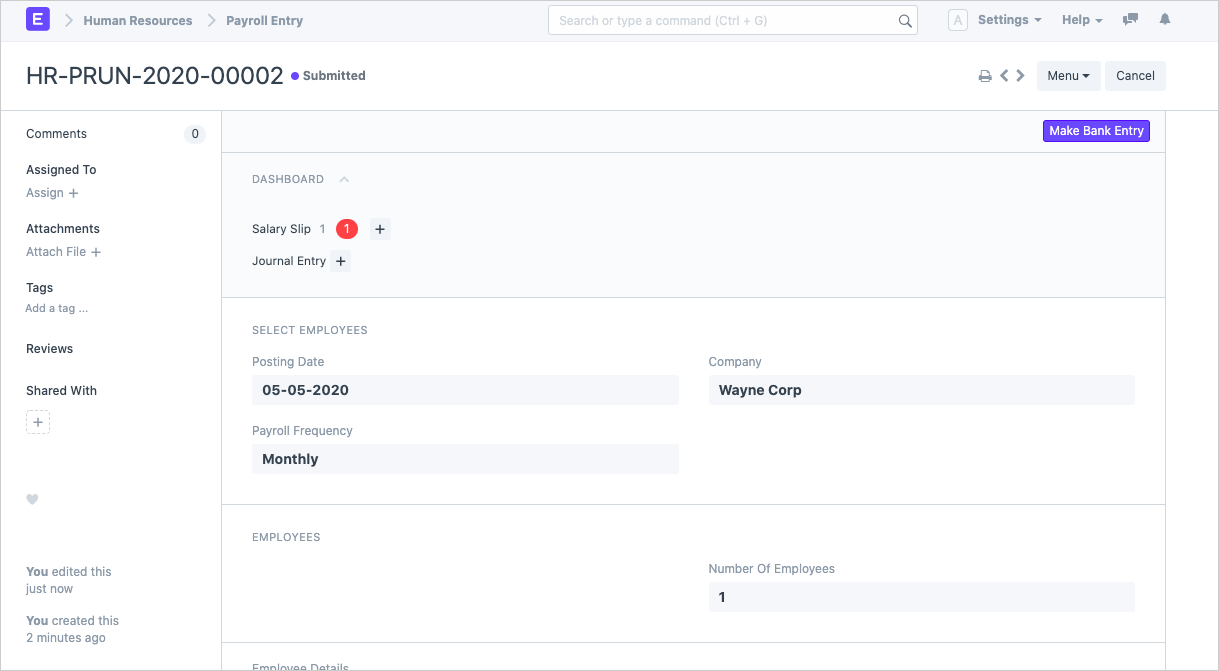
Figure 16: Bank Entry option in Payroll Entry
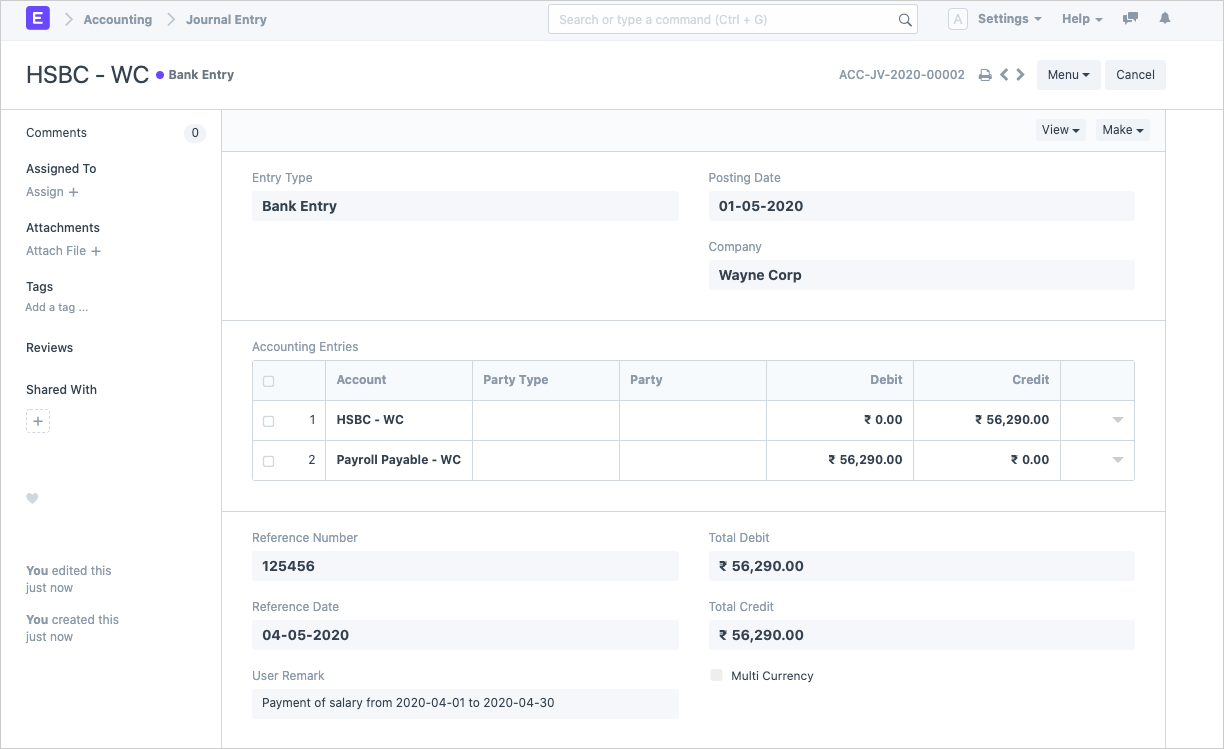
Figure 17: Bank Entry Made For Payroll
You can email the employees their salary slips one by one, or have them emailed automatically on submission. You can also apply password protection for the PDFs that are sent! These provisions are available in HR Settings.
Conclusion
Payroll management and processing is an important part of any organization and it’s necessary that this process goes smoothly. ERPNext lets you manage the payroll in just 7 steps with a lot of flexibility so that you’re complying with statutory requirements as well!
Kenneth Sequeira
Part-time film critic, full-time consultant
@Karan you can try setting it up on any of the demo sites.
And how can we add Taxes and Charges like Education CESS 4%. Its not appearing in payroll period setup stage.
Is there some place where you have already set this up and it's working? Need some more guidance on this.