5 Step POS - All you need to know about Point of Sale in ERPNext
Article 4 from "Must-Know-It Mondays" on an open-source and modern tool for managing retail POS counters effortlessly.
·
3 min read
Retailers big and small are retiring their traditional cash registers in favour of state-of-the-art POS systems that can help them achieve their goals and objectives efficiently. While the latest and greatest POS systems are leaps and bounds beyond their antiquated counterparts, IT problems can still occur. Following are some of the problems faced by most business owners:
- Compatibility (Phone/Tablet)
- Manual Data Entry
- Data Redundancy
- Scaling issues
- Lack of dimensional accounting
- Security
ERPNext — Open Source POS Tool
A modern solution, largely associated with small and medium businesses, ERPNext is raging across the industry as a no non-sense, value-for-money ERP software. Being fully open-source, ERPNext comes with no license fee.
ERPNext Point of Sale works both offline & online with synching enabled by default. You can also set up dimensions for each retail store outlet that you own. In fact, you can compare the P&L statement of each outlet as well! To setup POS, you need to follow few steps and that’s where this blog comes in handy.
ERPNext’s 5 Step Point Of Sale
Step 1: Setup Your Inventory
ERPNext’s Stock module lets you integrate your inventory and also does automatic posting in Stock Ledger. You must ensure that the perpetual inventory setting has been enabled in the Stock Settings. Learn the difference between the perpetual inventory system and periodic inventory system here. Figure 1.1 shows Image view of Items:
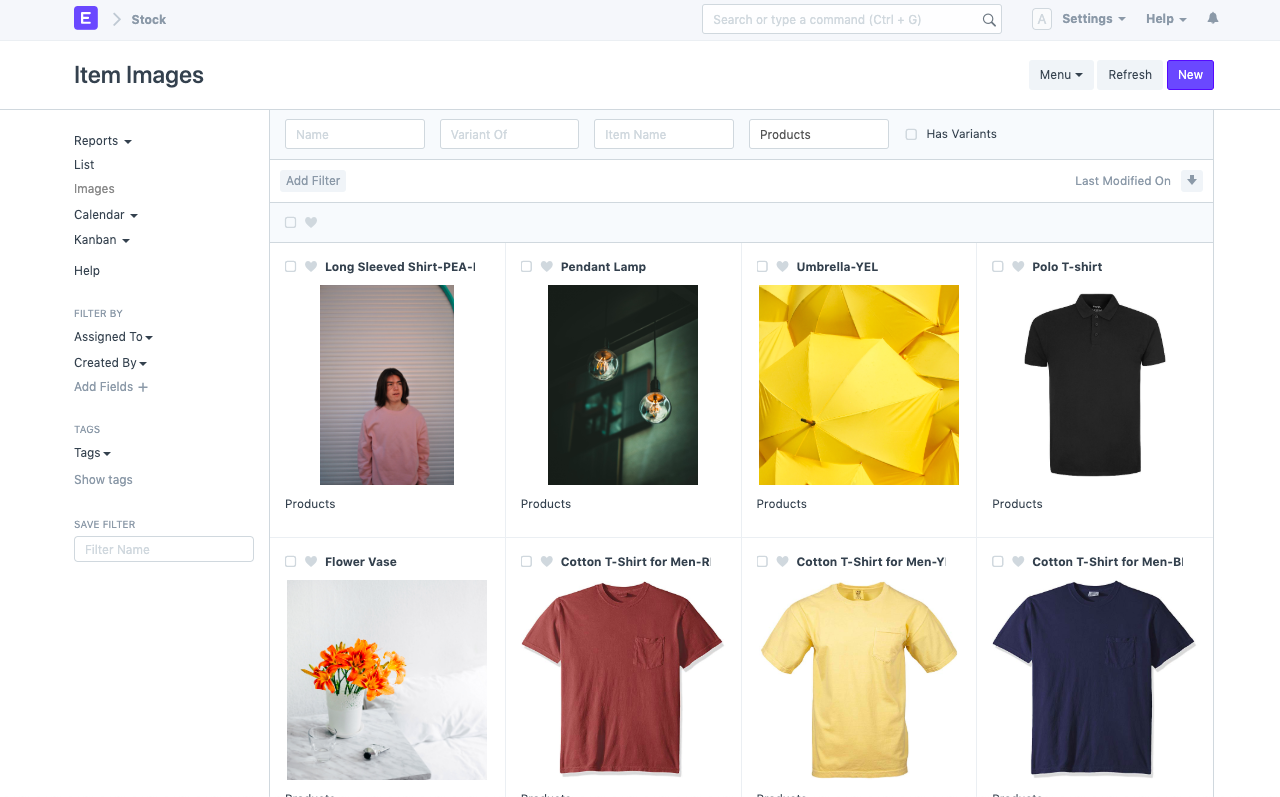
1.1 Image View of Inventory
Step 2: Add Item Prices
Setup the prices of your products with Item Price. You may have one or more Price Lists depending on multi-currency, branch wise product offers, and so on. Fig 2.1 shows Item Prices of various products in different currencies.
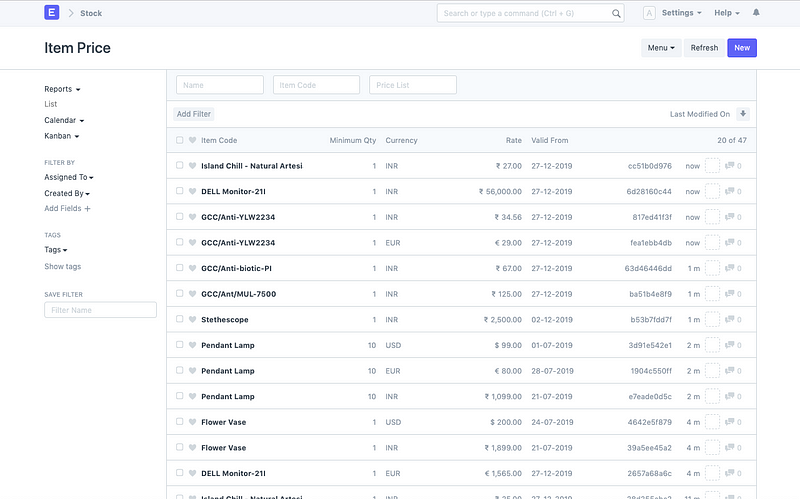
2.1 Item Price List
Step 3: Configure POS Profile
Now, you need to create a Point of Sale Profile. You can set up multiple profiles as per each retail outlet. One POS Profile can contain one or more users. Cashiers can also create Cash Closing Vouchers. Fig 3.1 shows a POS Profile configured for one branch of the company, “Cash Sales-Borivali”
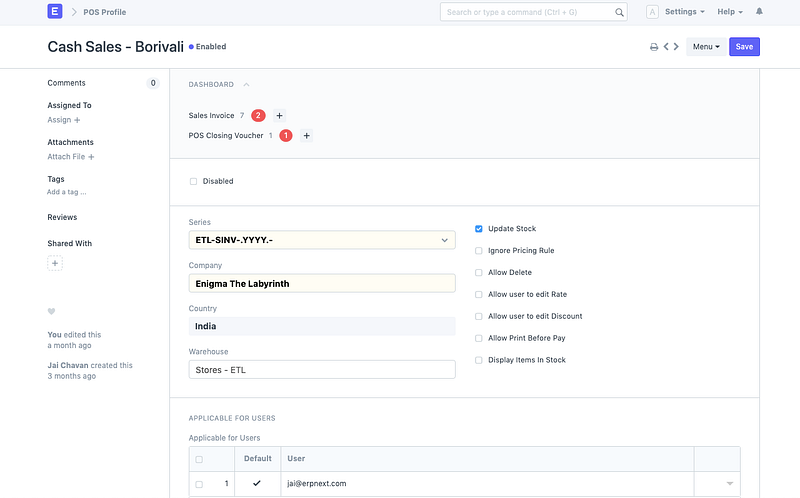
3.1 POS Profile of a Branch
Step 4: Open POS
4.1) In the awesome bar, type in “POS” and you’ll get the suggestion for “Open POS”. Once you select it, the POS screen is opened. You can select the Customer (you can have one customer configured as “Cash Sales/Branch Name”) as we have in below example, fig 4.1 shows the POS screen with the customer as “ETL-CUST-2019–00008” — a random naming series of Customer master.
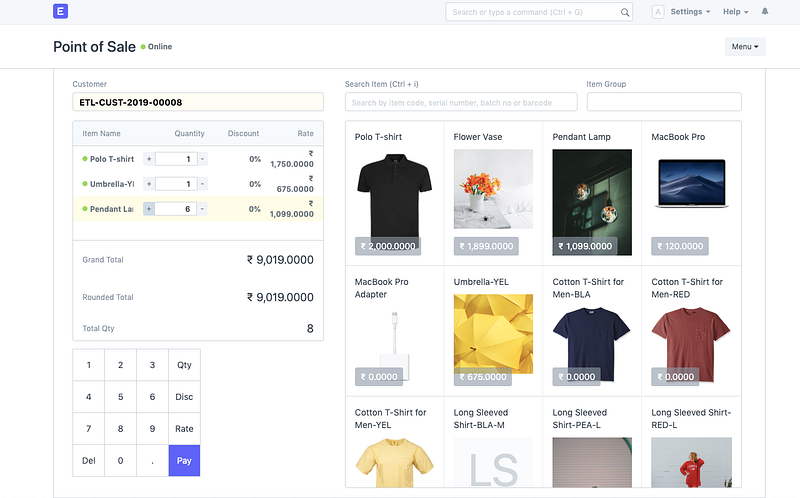
4.1 POS Screen with customer & products selected for a transaction
4.2) You can add the items that customer wishes to buy. There is a provision to navigate through the product list with respect to Item Code, Item Name, Serial Number of the Item, or the Barcode. You can also choose to scan item barcodes or serial numbers with a scanner.
4.3) Next, click on the “Pay” button to proceed with the transaction and complete the payment for it via cash or card (as per the setup of payment modes in POS Profile) ERPNext auto-calculates the change amount in case customer has paid more than outstanding amount. Fig 4.2 shows the screen for processing payments as customer has paid INR 9,020 when the outstanding amount is INR 9,019.
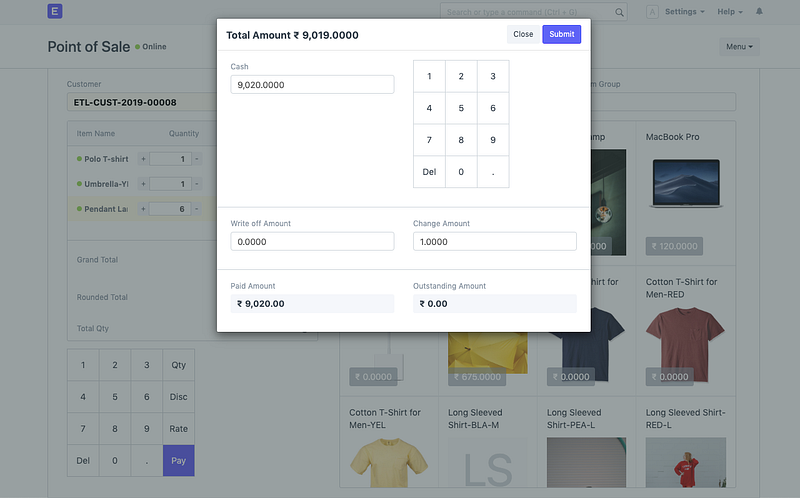
4.2 Entered Cash Amount as INR 9020 as received by the customer for this transaction.
Step 5: Invoice your customer
You can select the default print format template for the POS Sales Invoice that is generated by the system in POS Profile. Fig 5.1 shows a POS invoice of the transaction from Step(4)
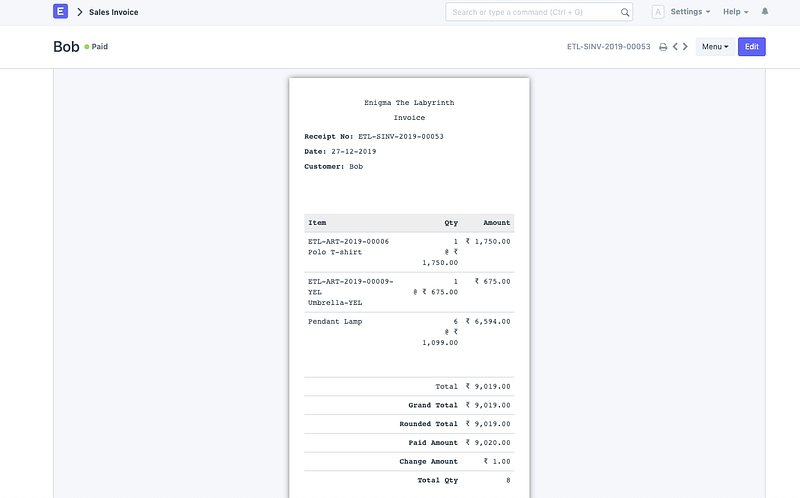
5.1 POS Sales Invoice for transaction done in the previous step
Other features of ERPNext:
- Offline POS: You can use Point of Sale in offline mode. Once the internet connection is available again, the system will synchronize the invoices.
- Configurable Print Formats: The configurable print formats lets you personalize your invoices as per your brand. Classy or professional, pick your take and create print formats easily with our drag & drop Print Format Builder.
- Multi-store Management: Register new branches of your company with a few clicks and start transacting right away! You can configure dimensions based on each branch or product line & analyse the expenses, stock movements, profits and loss to derive overall profitability of your supermarket business. You can analyse store-wise P/L and income statements easily with ERPNext's accounting dimensions.
- Promotional Schemes: Promotional schemes help businesses become successful as lower prices for a limited period of time to attract more Customers. In ERPNext, a Promotional Scheme is an easier way to manage pricing on multiple Item/Groups based on different parties and conditions. A Promotional scheme is linked to a pricing rule, against each slab system that will generate the pricing rule.
Try ERPNext POS here
---
Jai Chavan
Professional Cinderella @Frappe
Thank you Jai for the detailed POS document. I have 3 profiles as per each retail outlet. How can I select different profile when I open POS system. Right now I can only see the parent company POS profile.
Excellent write up!
tried doing it on ERPNext using the 'close POS' inside of the menu icon at top right of the platform but it kept on generating
thanks for this awesome breakdown on POS. how can one exit the POS platform once the person is done with a particular transaction. i tried doing it on ERPNext using the 'close POS' inside of the menu icon at top right of the platform but it kept on generating transaction vouchers.